PureLink (Classrooms and Community Room Presenting Technology)
Introduction
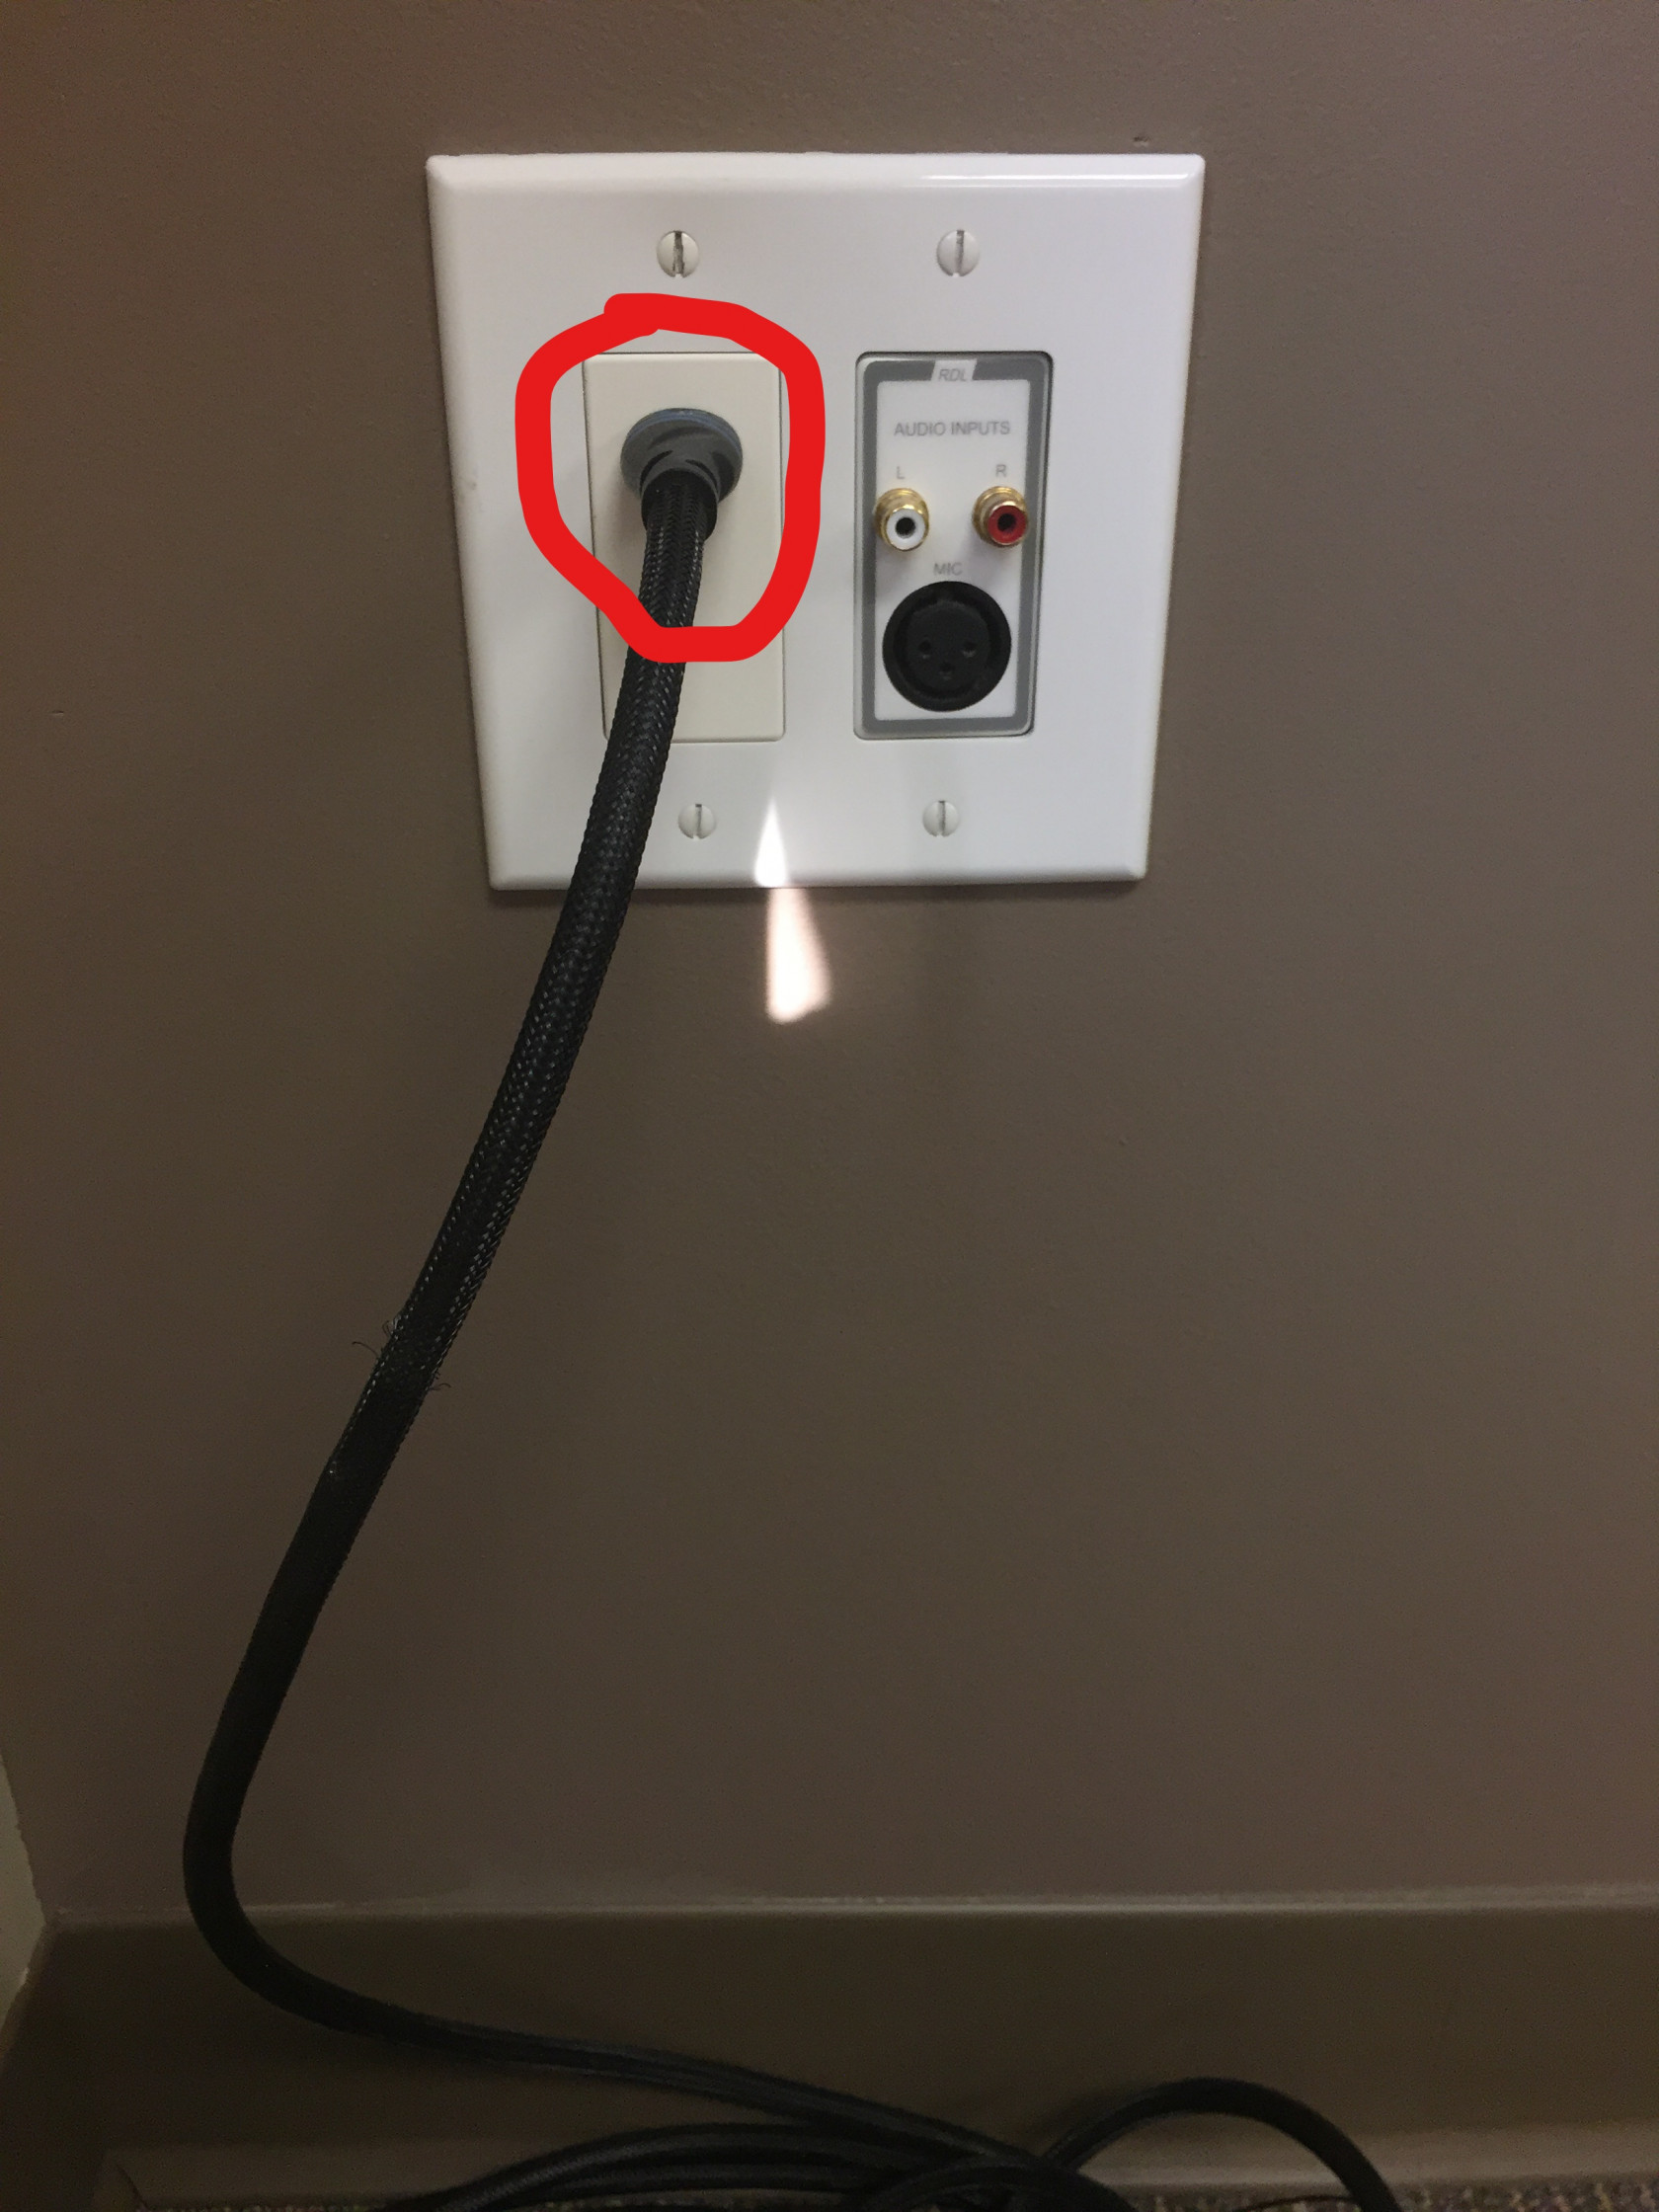
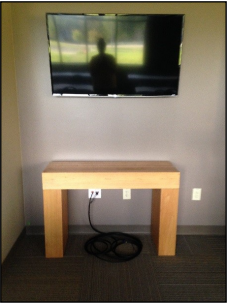
PureLink is a Presentation Tech service that handles the projection of media to the rooms in the Ghent Road Discipleship Wing: namely the Classrooms and the Community room. Each room has one HDMI wall input close to the floor (see Fig. 1) you can interact with that can be used to project your media to any room, any screen you want. It comes with an HDMI cable that you can connect your device with. (Look at end of page for diagram)
Fig. 1

Quick HOW TO:
- Turn on TV/Projector (It should already be on the proper HDMI input, but you may need to double check/adjust this).
- Make sure the provided HDMI cable is present and plugged in below TV on the floor (See Fig 1 above).
- Connect HDMI cable to presentation laptop. If necessary, use provided converters that are tethered to the HDMI Cable. If using DVD Player, hookup HDMI cable to DVD player.
- You may need to adjust your laptop display settings so that your laptop "extends" to the TV.
- Adjust sound volume from Touch Screen Sound Panel AND your computer appropriately.
Please read through the rest of the guide for more instructions and details.
Please be sure to arrive 30 minutes prior to your class, training, or group. This will give you ample time to set up your computer and troubleshoot any immediate issues.
PureLink Dashboard
Currently the PureLink Dashboard for the Bath Campus is publicly accessible at this address: http://purelink.graceohio.org/.
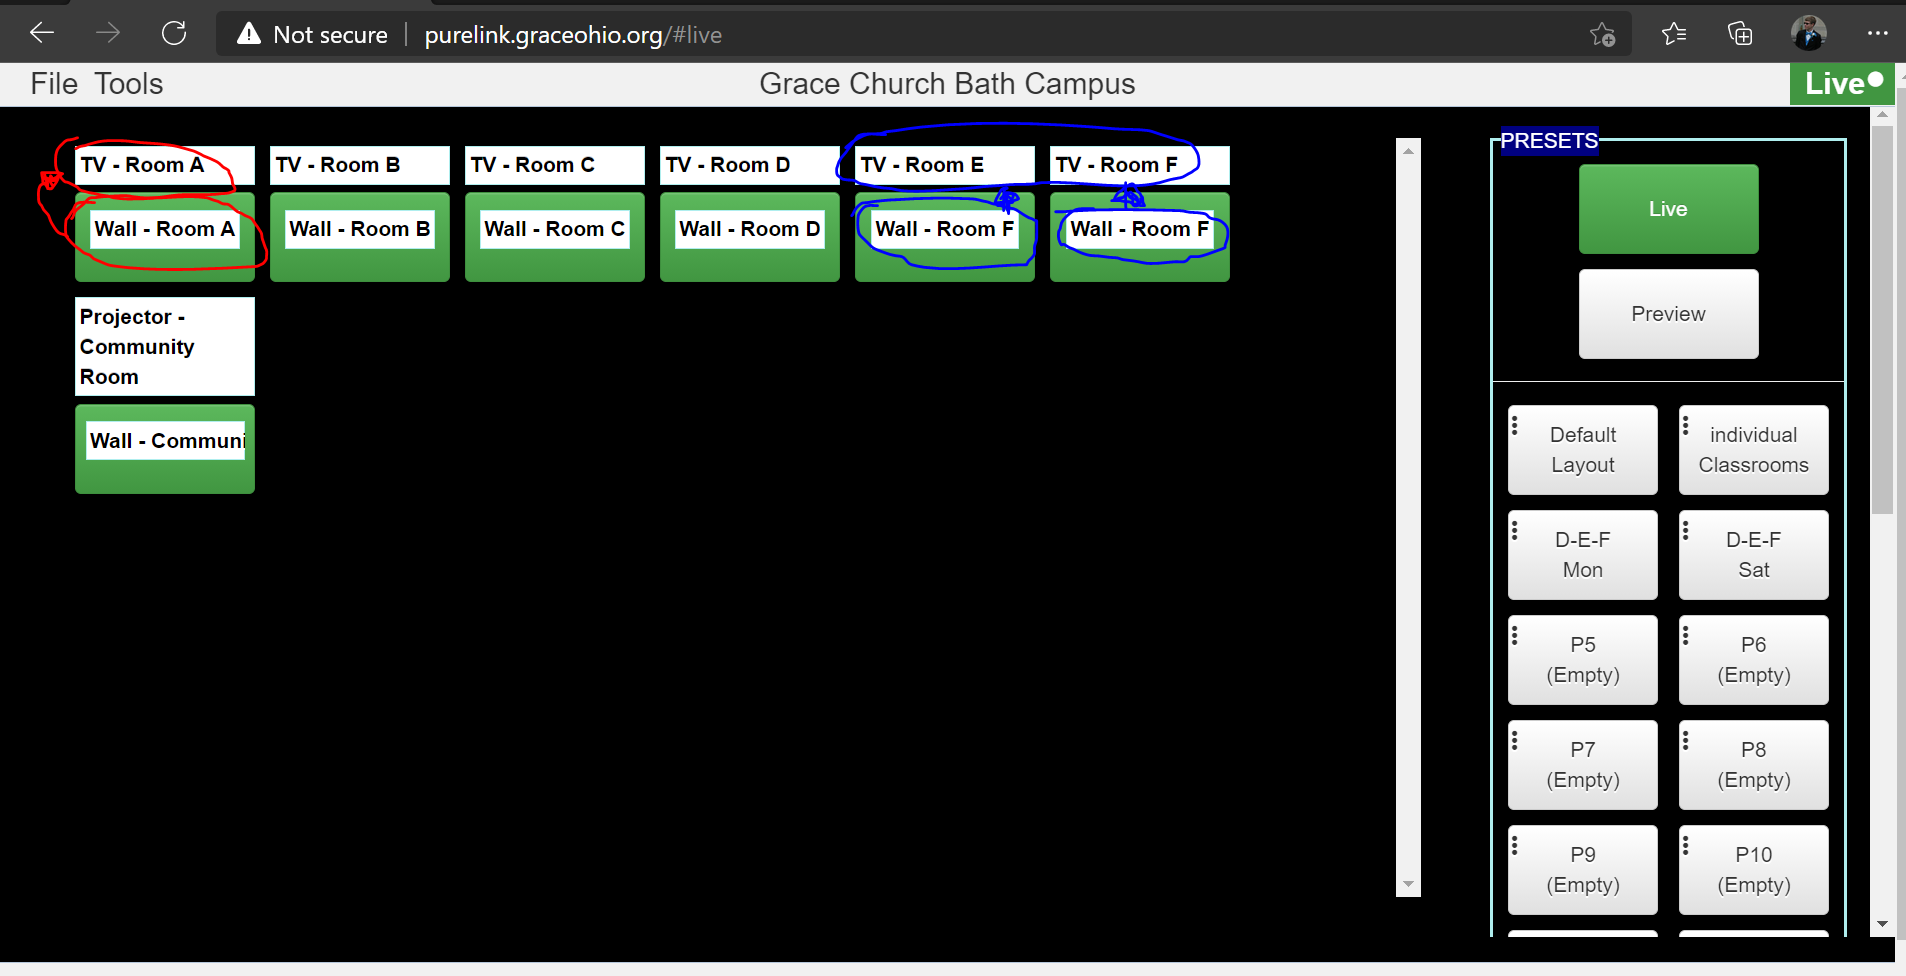
Here, you can configure how you want the inputs to project to the outputs you want. To be able to push changes live, ensure that you are in the Live mode. The Live button will be highlighted green if you are in Live mode. The left window of the dashboard shows all the TV's/Projectors that are connected on the PureLink network (i.e. TV - Room A) in white boxes above green boxes. Inside the corresponding green boxes is the source that the screen is grabbing its media from (i.e. Wall - Room A, which is the physical HDMI port on the wall in the room we saw in Figure 1).
I outlined a couple examples illustrating specific TV's and what their corresponding sources are in Figure 2 below. According to Figure 2, currently the TV in Room A is getting media from the port on the Wall in Room A. The TVs in Room E and Room F are both getting their media from the port on the Wall in Room F.
Fig. 2
Change Sources of Screens
You can also individually change the source of just one screen at a time. To change the source for a single display, on the main dashboard page click on the green box below the display you want to edit. Choose the source that you need to be projected on this screen by clicking on the corresponding green box. In this example below, I clicked and selected the TV in Room A in Figure 3 and am changing its source to have it use the port on the Wall in Room A in Figure 4.
Fig. 3
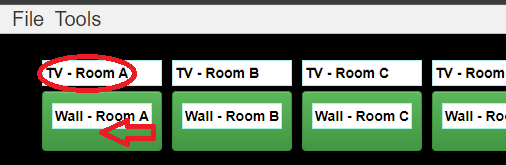
Fig. 4

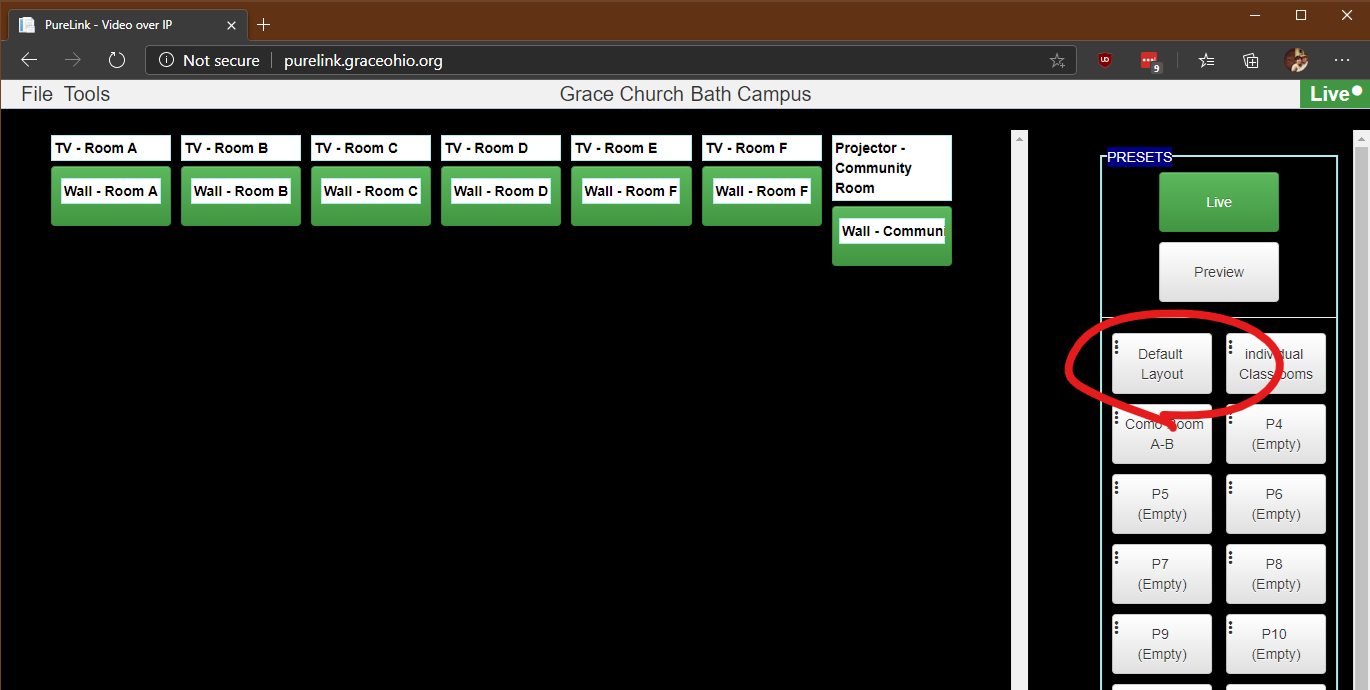
Additionally, you can load a preset that can load sources to multiple screens in just one click for you. For the weekend services, in most situations, you will be fine to click on Default Layout. Below in Figure 5 is what the layout of screens and sources looks like for this specific preset.
Fig. 5
If you think you would benefit from having a preset for your event (For example, Say you want to project to the TV’s in Classrooms A, B, C and the Community Room Projector while being hooked up in Room B), you can ask Grace IT to make a preset that represents that for you. Of course, just specify the event time, the classroom for the wall port(s) you will be plugging into and the screen(s) you would like to project to.
How to Project to the TV with your device
Click to show Community Room Projector Instructions
- Turn the Projector on. There is a hand sized, white remote that you can use and grab either from the front or the back of the room. Press the power button while pointing towards the projector.
- Locate the 25 ft HDMI Cable on the floor. Verify it is plugged into the wall port next to PK Clubhouse.
This cable should already be connected to OR located near the floor level wall port (see the above Picture). The port will be labeled with the classroom it is associated with: Example: Wall – Community Room Front. If it is not already, please plug it in to the floor level wall port. If it is missing, OR you need to use a different hookup location (for the Community Room the default is the Front wall), please let a Grace Staff member know. If you asked to use the Wall – Community Room Back Port, you may move the cable there if necessary.
- Turn the TV ON. (Located on Bottom right corner, backside of the TV has a circular button pad. Center button is power button. Left/Right buttons are the Channel Navigators. Up/Down is TV Volume ONLY)
- In the classroom, Locate HDMI Cable below the TV.
The cable should already be connected to the floor level wall port (see the above Picture). The port will be labeled with the classroom it is associated with. Example: Wall - Classroom B. If it is not already please plug it in to the floor level wall port. Please do not plug it directly into the TV in an effort to prevent user confusion. Please use the channel Navigators to set the TV to HDMI 1 or the proper HDMI input. - Identify what type of video port your computer has: HDMI, Display Port, or Mini Display Port.
- Connect HDMI cable to your computer. If your Computer has a:
- HDMI Port- Connect HDMI cable directly to your HDMI port.
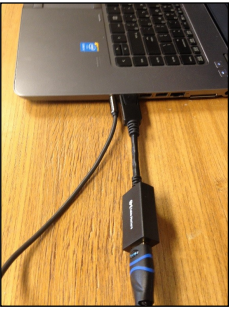
- Display Port- Connect HDMI cable to Display port adapter and then plug adapter into your computer. (See picture below)
- Mini Display Port- Connect HDMI cable to Mini-Display port adapter and then plug adapter into your computer.


Important! When you are done with the cables and want to remove them from your computer:
DO NOT PULL/YANK ADAPTER OUT OF COMPUTER PORT!!!
THERE IS A RELEASE BUTTON YOU MUST HOLD AND PULL TO RELEASE THE ADAPTER!!!
Your computer screen should now be projecting to the TV. If not, or if it is projecting incorrectly please follow additional computer display setting instructions below.
How To Extend Your Computer Screen To The TV
WINDOWS INSTRUCTIONS:
This is the quickest way to extend the computer screen to the TV:
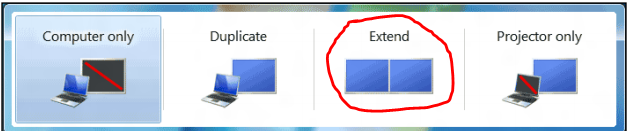
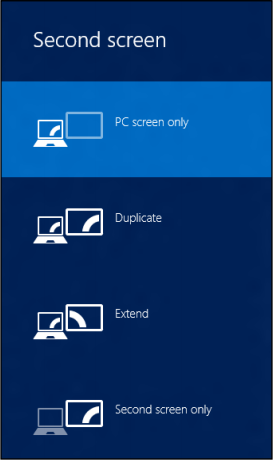
Press the Windows Key + P hotkey combination. Choose "Extend" from the list that appears if you want the TV and computer screen to be different from each other. Choose “Duplicate” if you want them to be the same.
Windows 7
Windows 10 / 11
The TV screen will now be extended from your computer screen.
(This means viewers will not see what is viewable on your laptop screen: you will have to manually drag over the windows
you want your viewers to see onto the TV with your mouse)
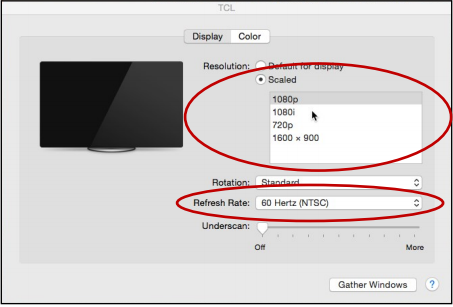
MAC INSTRUCTIONS:
Open/Search "System Preferences":
- Select "Displays".
- Select "Arrangement".
- Un-Select "Mirror Displays" (If you want your computer screen and TV to be different screens)

An additional "Display" window will appear for the TV after un-selecting “Mirror Displays". If you can't see it click the "Gather Windows" button. In your Display window select "Scaled". A drop-down box will appear; select "1080i". Also make sure your "Refresh Rate" is set to "60Hertz (NTSC)" if applicable.
The TV screen will now be extended from your computer screen.
(This means viewers will not see what is viewable on your desktop, you will have to manually drag over the windows
you want your viewers to see on the TV with your mouse)
Adjust the Room Sound and Control
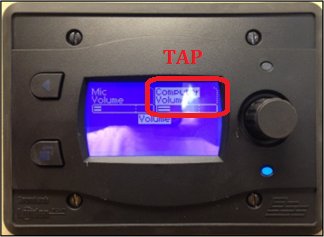
If you need to adjust the volume in your room please use the touch screen panel nearest your computer/TV. Tap on Computer Volume to select it, and adjust the volume up by rotating the knob clockwise. Decrease the volume by turning the knob counter clockwise. This controls the room ceiling speakers system.
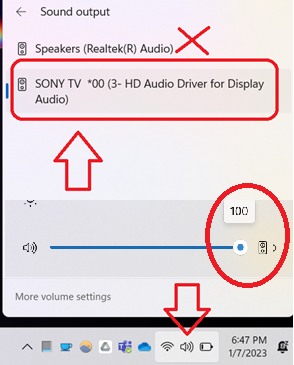
If you need to play sound to the room, just make sure that the volume on the touch screen panel is not all the way off, and ensure that volume on your computer is also not off or muted. (Note: Also, you need to be using the Wall port with the HDMI cable to be able to broadcast the sound to the room ceiling speakers system.) You will also need to change your sound device to use the sound system and not your computer speakers (See picture above)
Please be mindful of other classrooms or services when adjusting your volume level!
Troubleshooting: TV(s) / Projectors displays only a PureLink splash screen, or nothing
- Please do not disconnect cables behind the TVs. Return all provided cables and dongles if you move them from their original location so that the setup is consistent for the next user. Disconnecting these cables has caused confusion and more issues.
- Make sure that your computer is plugged into the correct "Room Wall". It will be labeled according to its room. Example:
Wall - Room A (also remember, you need to use the bottom wall HDMI connection with the provided HDMI cable shown in Figure 1: you are not supposed to disconnect or reconnect anything other than directly to your computer), and that the dashboard shows it is grabbing the corresponding wall as a source for the TV's you want. - Ensure the TV/Projector is powered on.
- If the TV is turned on but your media is not displaying still and you verified you have enabled the proper display settings on your computer, make sure the TV is set on the correct HDMI source (please make sure the HDMI cable connections are secure). Using the left and right cardinal direction buttons on the back of the TV, channel through HDMI 1, 2, or 3 if necessary. (Note: There should only be one source that the TV is set to since there should only be one HDMI cable that connects to the TV, which is connected to our PureLink box on the wall).
- If the Community Room Projector is turned on but your media is not displaying still and you verified you have enabled the proper display settings on your computer, make sure the Projector is set on the correct HDMI source. You can either push the buttons on the Projector directly, or use the remote that is usually located in the Wooden ClubHouse above the doorframe.
- Please ensure that you have followed the steps from earlier for extending your computer screen to the TV.
PureLink Dashboard Won't Show Up
- Please ensure you are connected to the internet. The churches' public Wi-Fi access point is Grace Church and does not require a password to connect. If you are on staff, the Grace Staff access point will also work so please use that if you are using staff equipment.
- If the dashboard still doesn't show up or is not responding, please let IT know by submitting an issue through the helpdesk or calling on Telzio.
Please do not disconnect cables behind the TVs. Thank you for your understanding!
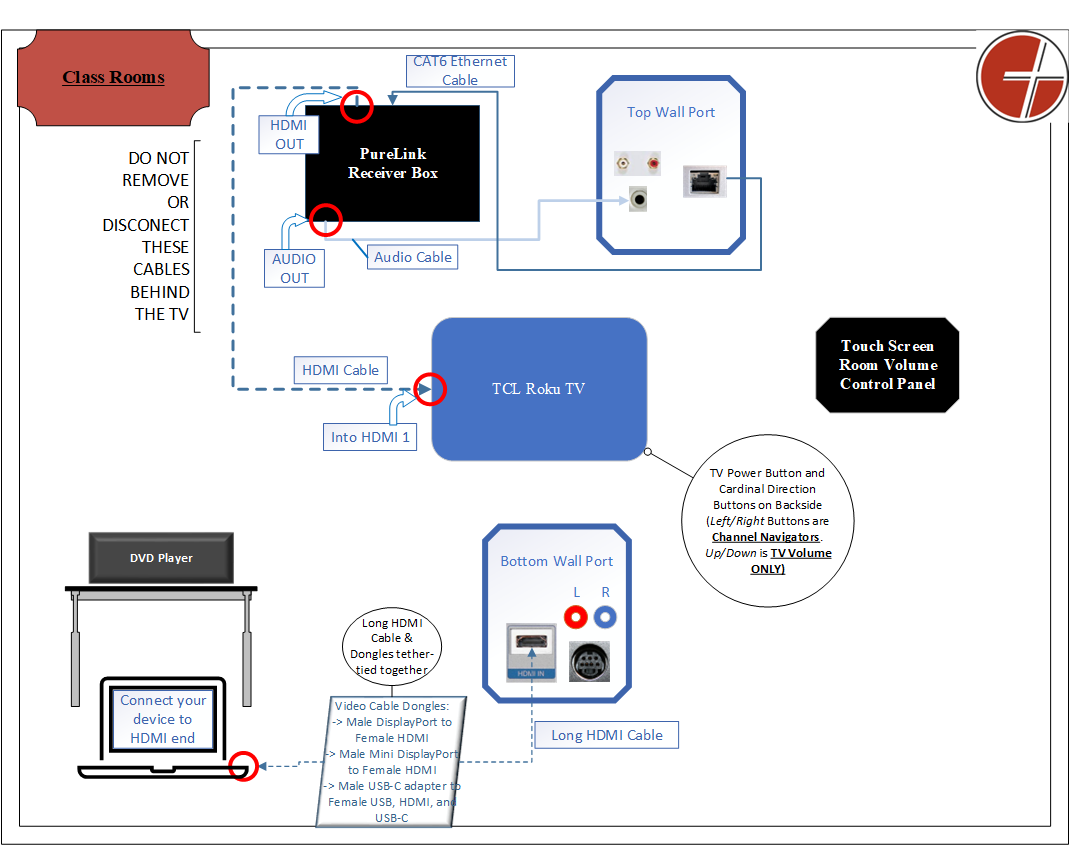
ClassRooms PureLink Connections Diagram
Community Room PureLink Connections Diagram
