Multi Factor Authentication - MFA - 2FA
GraceOhio Login 2FA Approval Process with phone app 
Grace IT is rolling out and enforcing this MFA policy to all Staff in order to improve the security of our organization and help reduce potential headaches. If you are enrolled in MFA, you will need to have your phone as an additional method of authenticating yourself (on top of your password) to log in to your Work Office365 account. The easiest way to do this is by using the Microsoft Authenticator App on your phone;phone with push notifications; however, you can use a different method or authenticator if you prefer.
The benefits of being enrolled in MFA is that you do not have to worry about resetting your Work Office365 and Work laptop password regularly, and you will not get any more password reset notifications/emails. MFA also makes it increasingly difficult for anyone else to access your account since they need your password and your approval from your phone in order to sign in, making this a critical technology in cybersecurity.
Standard 2FA Method: Microsoft Authenticator (App Push Notification)
The default (and most straightforward and quickest) method that Grace IT sets up everyone with is the push notification through the Microsoft Authenticator App. When a sign in attempt is made to your account, a push notification is sent to your phone asking to Approve or Deny the login attempt. This method can be changed to another one, if you desire, through your Microsoft Account page. Instructions for setting up MFA using this method are listed below:
A passcode lock on your phone is required by our organization in order to use the Microsoft Authenticator App and the Outlook app together. You will need to setup a 4 or 6 digit passcode on your phone in order to properly use the Authenticator app. Please set this up before proceeding through the below instructions.
Setting up the method manually yourself
1) Install the latest version of the Microsoft Authenticator app, based on your phone:
-
Google Android. On your Android device, go to Google Play to download and install the Microsoft Authenticator app.
-
Apple iOS. On your Apple iOS device, go to the App Store to download and install the Microsoft Authenticator app.
- You won't need to open the app just yet. Proceed to the next step while the app is downloading in the background,.
2) Configure 365 account in Authenticator App
- Sign into your Office365 at https://myaccount.microsoft.com/
- Select Security info in the left menu or by using the link in the Security info pane. If you have already registered or been registered by IT, you'll be prompted for two-factor verification. Then, select Add method in the Security info pane.
- On the Add a method page, select Authenticator app from the drop-down list, and then click Add.
- On the Start by getting the app page, click Next.
-
Remain on the Set up your account page while you set up the Microsoft Authenticator app on your mobile device.
- Open the Microsoft Authenticator app on your phone, select to allow notifications (when prompted), select Add account from the Customize and control icon on the upper-right, and then select Work or school account.
-
Return to the Set up your account page on your computer, and then select Next. The Scan the QR code page appears.
-
Scan the provided code with the Microsoft Authenticator app QR code reader, which appeared on your mobile device after you added your work or school account.
-
The Authenticator app should successfully add your work or school account without requiring any additional information from you. However, if the QR code reader can't read the code, you can select the Can't scan the QR code link and then manually enter the code and URL into the Microsoft Authenticator app. For more information about manually adding a code, see Manually add an account to the app.
-
-
Select Next on the Scan the QR code page on your computer. Pay attention to your phone afterwards.
-
A notification is sent to the Microsoft Authenticator app on your mobile device, in order to test that MFA works with your account.
- You will need to open or tap on this notification to approve your sign in attempt.
-
- Approve the notification request within the Microsoft Authenticator app, and then select Next.
- Congratulations, you have successfully added MFA to your Work Office365 account!
-
If you are an iOS user, please read through the "Situational" section in this article.
Setting up the method when required by your organization
Follow this instruction list if you see a "More information is required by your device" prompt when you try to use an Office 365 application. This means that we pushed the MFA policy onto your Office 365 account, which forces you to setup MFA in order to continue using your 365 applications.
1) Install the latest version of the Microsoft Authenticator app, based on your phone:
-
Google Android. On your Android device, go to Google Play to download and install the Microsoft Authenticator app.
-
Apple iOS. On your Apple iOS device, go to the App Store to download and install the Microsoft Authenticator app.
- You won't need to open the app just yet. Proceed to the next step while the app is downloading in the background,.
2) Configure 365 account in Authenticator App
- Proceed to the next page following "More information is required by your device".
- On the Start by getting the app page, click Next.
-
Remain on the Set up your account page while you set up the Microsoft Authenticator app on your mobile device.
- Open the Microsoft Authenticator app on your phone, select to allow notifications (when prompted), select Add account from the Customize and control icon on the upper-right, and then select Work or school account.
-
Return to the Set up your account page on your computer, and then select Next. The Scan the QR code page appears.
-
Scan the provided code with the Microsoft Authenticator app QR code reader, which appeared on your mobile device after you added your work or school account.
-
The Authenticator app should successfully add your work or school account without requiring any additional information from you. However, if the QR code reader can't read the code, you can select the Can't scan the QR code link and then manually enter the code and URL into the Microsoft Authenticator app. For more information about manually adding a code, see Manually add an account to the app.
-
-
Select Next on the Scan the QR code page on your computer. Pay attention to your phone afterwards.
-
A notification is sent to the Microsoft Authenticator app on your mobile device, in order to test that MFA works with your account.
- You will need to open or tap on this notification to approve your sign in attempt.
-
- Approve the notification request within the Microsoft Authenticator app, and then select Next.
- Congratulations, you have successfully added MFA to your Work Office365 account!
-
If you are an iOS user, please read through the "Situational" section in this article.
Situational: If you are an iOS user AND use the built in Mail or Calendar App for Work:
![iu[2].jpg](https://kb.gracechurches.org/uploads/images/gallery/2021-06/iu2.jpg)
![]()
Unfortunately, as of right now Apple's built in Mail and Calendar apps (if you use them for work) will eventually stop working when you setup MFA! This is because they are unable to bring up the prompt for 2FA when you are already signed in (very specific technical reason on Apple's end). You will have to remove your Office 365 account and re-add it in order to keep using these apps for work. Because of this, Grace IT STRONGLY recommends you switch off the built in MAIL/CALENDAR apps and use the Outlook App.
If you follow these steps, however, you will be able to get these back up and running! (You also have the option of using the Outlook App, which does not have this reauthentication issue and supports both mail and calendar functionality.)
- Open your settings app.
- Scroll down and find either "Mail" or "Calendar". Tap one of them. If you use both for work, you may want to take note of your preferences that you may have setup for each.
- Tap "Accounts"
- Find and Tap on your Work account. It will have the graceohio/gracechurches email address.
- Take note of the work content that you are syncing (Mail, Contacts, Calendars, Reminders, and Notes).
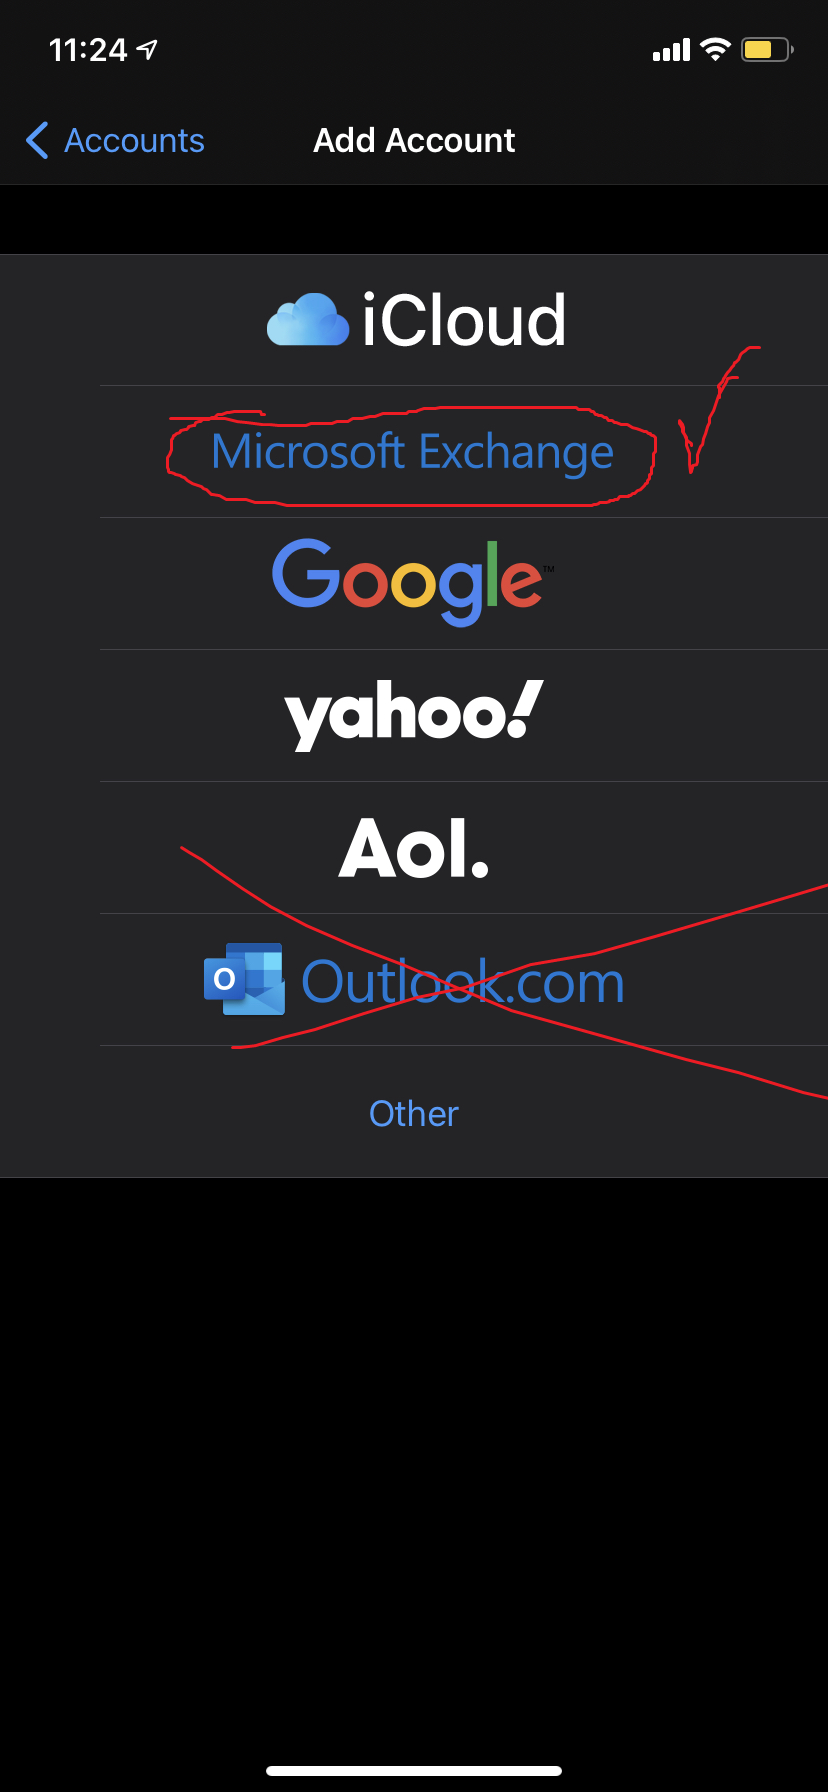
Then click on Delete Account. - When it finishes removing your account from your phone, you should be taken back to the accounts screen. Tap on "Add Account"
- You will see a list of email services you can select. Be sure to choose Microsoft Exchange, as Office365 accounts will only work with this and not the Outlook.com option.
- In the new screen that pops up, enter your work email here. Also put in a name for this account that you will recognize (For example: Grace Church - Work).
- Tap Next. This will probably trigger 2FA, so you will need to approve the sign in attempt if it does ask.
- The screen that lets you choose to sync specific content appears. Refer back to your note for what content you sync and enable those respectively. Hit next
- Your mail/calendar/content will start syncing. This may take a minute, or if you have tons of calendar appointments/events it could take a couple hours to finish. We recommend leaving your device charging if it is taking more than a few minutes. You should be all set.

UPDATE: You may see a prompt like this picture below on your phone when roughly 60 or 90 days pass. Apple forces you to reauthenticate after that period of time but vaguely prompts you to do it vaguely with this prompt.message. PLEASE keep this in mind if you really want to use the iOS Mail app, as when the period time passes by you will stop receiving mail and calendar updates again until you reauthenticate your account again. There is not much that IT can do to remedy this as this primarily Apple technology issue. The Outlook appApp does not have this issue, so IT again recommends you to use that as your Mail and Calendar App solution for work.
If you see this picture,picture below, your iOS Mail/Calendar app wants you to reauthenticate your work account. ItAs you can tell from what it specifically asks: it vaguely tells you this vaguely,this, but you will need to address it to continue receiving email and calendar updates using the iOS mail and calendar apps.

-
- You can tap Edit Settings to re-enter your password for your Office365 account. You can also re-enter your password by going to the Settings app, then to Mail or Calendar. Tap on accounts and and tap on your work account..
Logging into GraceOhio/Microsoft Office365 Account steps
Once you are setup with a MFA method using one of the guides above, you can reference the same two GIF's at the top of this page to get a general idea of the process of using the Authenticator app to login down here as well (Reload the page if the demonstration GIF's go out of sync, synchronizing GIF's is really difficult). The general login process goes as follows in these bullet point steps:
| Computer View (www.office.com for example | iPhone View (Using Authenticator App to approve MFA) |
- Goto/Open Microsoft Office365 service you are licensed for. In this case, we are logging into www.office.com in the Microsoft Edge web browser.
- On the Login Screen, Enter your Email Address, and then Password.
- Upon successful credentials entry, you may need to provide MFA. In the case where you do, you will either automatically receive a push notification or you can send it yourself or send a different MFA request if you set one up (ex SMS code or email code).
- If you are authenticating in for the first time on the application in question, OR
- If you logging in after 30/60/90/365 days (This number depends on the application, or what option you choose for the "Don't ask again" prompt)
- If you receive the Push Notification, just make sure you have your phone on you. Tap on the push notification to bring up the Authenticator app, and tap approve if it is you who is trying to sign in.
- All done! You can get started now!
Tips and Cautions to be aware of
Tips
- On the step where you are entering your credentials, You may also have the option to sign in using the app rather than using password if you prefer, via the Use an App instead method shown above. This is called a passwordless login method. You can enable it, if you want, by following Microsoft's steps:
- Browse to https://aka.ms/mysecurityinfo .
Sign in, then click Add method > Authenticator app > Add to add the Authenticator app.
Follow the instructions to install and configure the Microsoft Authenticator app on your device.
Select Done to complete Authenticator configuration.
In Microsoft Authenticator, choose Enable phone sign-in from the drop-down menu for the account registered.
Follow the instructions in the app to finish registering the account for passwordless phone sign-in. - Once you have the Authenticator App setup on yuor phone, you can follow the this guide: Sign in to your accounts using the Microsoft Authenticator app
- Browse to https://aka.ms/mysecurityinfo .
- On the step where you need to provide MFA, it will also ask if you don't want to be asked again for a certain amount of time, which you can optionally check off if you want.
Cautions
Please keep these tidbits of information in mind to help protect yourself and our church from harm.
Approximately 1 Minute to accept MFA requests
Change or Add 2FA method
You can access your Microsoft Account page here. The link takes you to the security section. Here you can remove and add methods (Phone text or call, Email, or another Authenticator App), as well as take a look at your default and current methods. This resource will be useful if you ever go through the process of changing or upgrading your phone, as your Multi Factor configuration is not carried over to your new device automatically.