| Campus | Location | Model | Serial # | Identifier | Toner Cartridge Model | Unit Location | Toner Ship to | IP Address |
| Akron East | Office | Canon DX C3826i | 3GA10014 | A11490 | GPR-53 | 2330 E. Market St. Akron, OH 44312 | 2330 E. Market St. Akron, OH 44312 | 10.11.10.40 |
| Akron East | Church | Canon iR-ADV C255 /P | WKN05144 | A10849 | GPR-51 | 737 George Washington Blvd Akron, OH 44312 | 2330 E. Market St. Akron, OH 44312 | 10.7.10.40 |
| Barberton | Office | Canon DX C3826i | 3GA10011 | A11495 | GPR-53 | 629 Wesleyan Ave Barberton, OH 44203 | 629 Wesleyan Ave Barberton, OH 44203 | 10.6.10.40 |
| Bath | Ghent | Canon DX C5840i | 2YJ15395 | A11492 | GPR-61 | 754 Ghent Rd. Akron, OH 44333 | 211 N. Cleveland Massillon Rd. Akron, OH 44333 | 10.2.10.43 |
| Bath | Montrose | Canon DX C3826i | 3GA08600 | A11489 | GPR-53 | 565 S. Cleveland Massillon Rd. Akron, OH 44333 | 211 N. Cleveland Massillon Rd. Akron, OH 44333 | 10.2.10.44 |
| Bath | Annex | Canon DX C257iF | 4QS01001 | A11484 | GPR-58 | 211 N. Cleveland Massillon Rd. Akron, OH 44333 | 211 N. Cleveland Massillon Rd. Akron, OH 44333 | 10.2.10.42 |
| Bath | Office - Downstairs | Canon DX C5860i | 2XK05290 | A11372 | GPR-61 | 211 N. Cleveland Massillon Rd. Akron, OH 44333 | 211 N. Cleveland Massillon Rd. Akron, OH 44333 | 10.2.10.41 |
| Bath | Office - Upstairs | Canon DX C3826i | 3GA10176 | A11487 | GPR-53 | 211 N. Cleveland Massillon Rd. Akron, OH 44333 | 211 N. Cleveland Massillon Rd. Akron, OH 44333 | 10.2.10.40 |
| County Line | Office | Canon DX C3530i | WSB00735 | A11553 | GPR-53 | 14960 Seville Rd, Sterling, OH 44276 | 14960 Seville Rd, Sterling, OH 44276 | 10.9.10.40 |
| Medina East | Green Room | Canon DX C5860i | 2XK06327 | A11498 | GPR-61 | 2325 Medina Road Medina, OH 44256 | 2325 Medina Road Medina, OH 44256 | 10.4.10.40 |
| Norton | Office | Canon DX C5860i | 2XK05882 | A11499 | GPR-61 | 3970 Cleveland Massillon Rd. Norton, OH 44203 | 3970 Cleveland Massillon Rd. Norton, OH 44203 | 10.1.10.40 |
| Norton | Power Kids | Canon DX C3826i | 3GA09814 | A11488 | GPR-53 | 3970 Cleveland Massillon Rd. Norton, OH 44203 | 3970 Cleveland Massillon Rd. Norton, OH 44203 | 10.1.10.42 |
| Norton | Reception | Canon DX C257iF | 4QS01143 | A11485 | GPR-58 | 3970 Cleveland Massillon Rd. Norton, OH 44203 | 3970 Cleveland Massillon Rd. Norton, OH 44203 | 10.1.10.41 |
| Town Center | Office | Canon iR-ADV C3530 /P | WSB01406 | A11555 | GPR-53 | 3005 Ring Rd Kennesaw, GA 30144 | 3005 Ring Rd Kennesaw, GA 30144 | 10.8.10.40 |
When going to make print jobs, you will need to make sure that the Uniflow SmartClient is running in the background on your computer. Nothing will happen if the software is not running on your computer, and you try to print something. The software is automatically deployed to all licensed staff computers. It will look something like this in your system tray or your menu bar when it is running:
[](https://kb.gracechurches.org/uploads/images/gallery/2023-01/image-1675090093623.png)[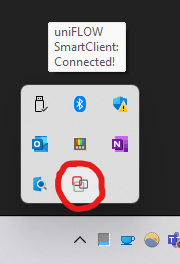](https://kb.gracechurches.org/uploads/images/gallery/2023-01/image-1675197066020.png)If you are using the Direct Printer option from the SmartClient, please also make sure that you are on the "Grace Staff" Network, and not the public Grace Church Network when making prints. If you were assigned a laptop, it was automatically assigned to the Staff network when it was given to you.
#### **Get Started** You can initialize your Uniflow account by going to [https://gracechurch.us.uniflowonline.com/](https://nam10.safelinks.protection.outlook.com/?url=https%3A%2F%2Fgracechurch.us.uniflowonline.com%2F&data=05%7C01%7Cjfahringer%40graceohio.org%7C8425928262d949bd1b0308dad474e375%7Cf80469b65a81464fa6f14ad8e4ac448a%7C0%7C0%7C638055895772201929%7CUnknown%7CTWFpbGZsb3d8eyJWIjoiMC4wLjAwMDAiLCJQIjoiV2luMzIiLCJBTiI6Ik1haWwiLCJXVCI6Mn0%3D%7C3000%7C%7C%7C&sdata=tj69sbpaT6hPQBDEeeQQyfYLDqj9dzRDh2mqgu%2BPSxY%3D&reserved=0). You will need to do this before you can start printing or scanning. When you login you will be taken to the UniflowOnline Dashboard. Your account will be initialized with Single Sign On (SSO), or in other words it will be attached to your Office365 account (GraceOhio / BuildMomentum). If you are on Grace Church staff, click on the "Continue with Grace Church Login" button. If you are on the Momentum Staff located at the Bath Offices, click on the "Continue with Momentum Ministry Partners Login" button. [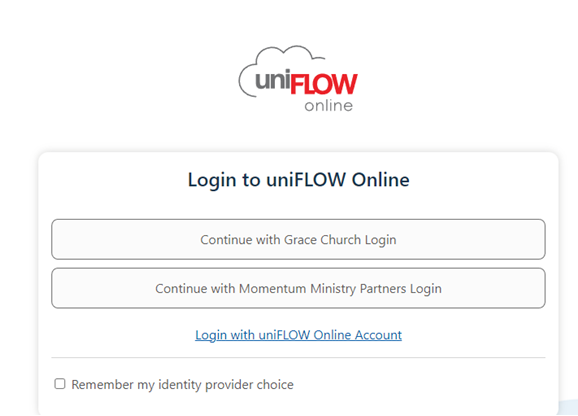](https://gracechurch.us.uniflowonline.com/) You will receive a four digit PIN which you will need in order to access the printers for Secure Prints, or for copy and scanning functionality. You can find it anytime in the UniflowOnline Dashboard under your account identities info. [](https://gracechurch.us.uniflowonline.com/#Dashboard/) ### **Printing** ##### **Setup the SmartClient on your Computer** If you don't happen to have the SmartClient installed, or if it is not running correctly and you need to reinstall it, you can download Windows or macOS drivers anytime from the "Start Printing" option in the left pane. You can also get started with your print jobs right away using the drag and drop option on the Uniflow Online web interface shown in this location. [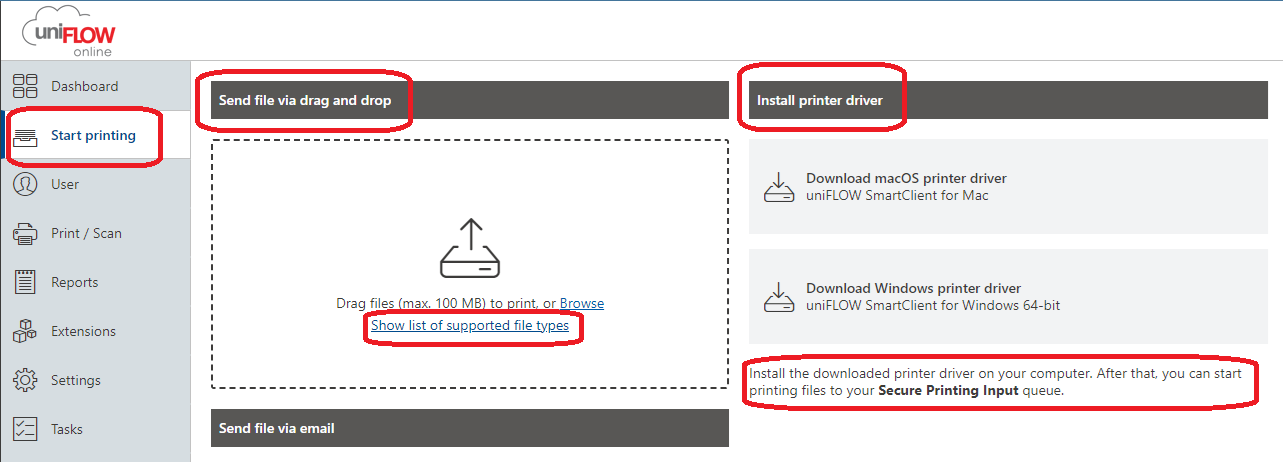](https://gracechurch.us.uniflowonline.com/#StartPrinting/)Note: when downloading the Windows printer driver, it might ask you a few times for you to keep/run or mark the application as safe. Allow each time the prompt is brought up.
The first time you are running the Smart Client on your computer, *you will* *need to initialize it* before you can start sending print jobs to the Cloud queue or make direct print jobs. If it needs initialized, it may pop up as a separate window whenever you start your computer and look like this: [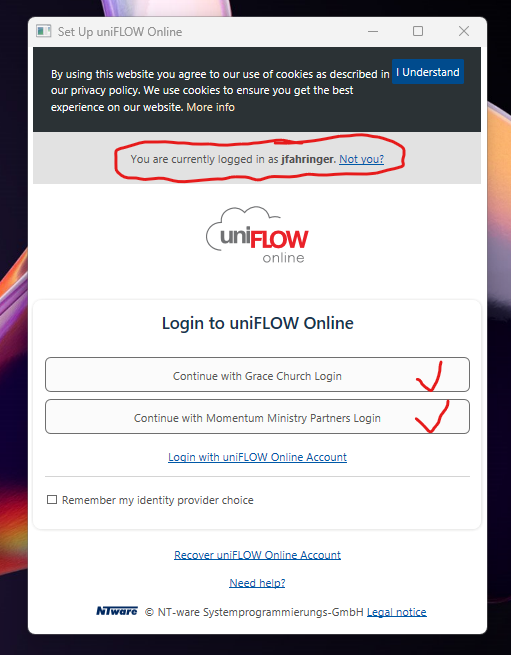](https://kb.gracechurches.org/uploads/images/gallery/2023-01/image-1675095036607.png) When you click on either the corresponding Grace Church (Staff) or Momentum Ministry Partners (Staff) option, it will open your default browser to authenticate your client. It does this with your Office 365 account that is currently signed into your browser. If you are not signed into the browser with your Office 365 account it will prompt you to do so. Otherwise, the initialization process goes very quickly, and will look like this when done (1. The Browser window, 2. The SmartClient prompt): [**1)** 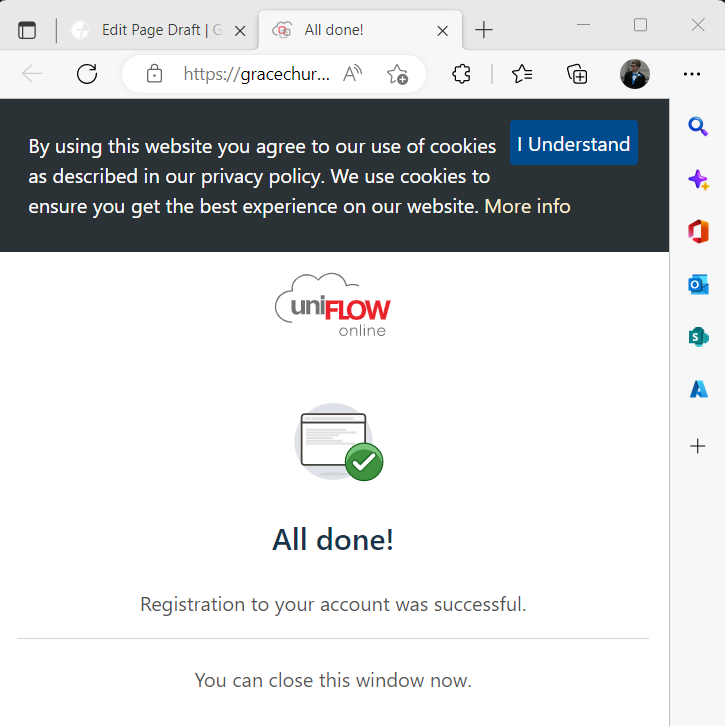 **2)**](https://kb.gracechurches.org/uploads/images/gallery/2023-01/image-1675095321799.png)[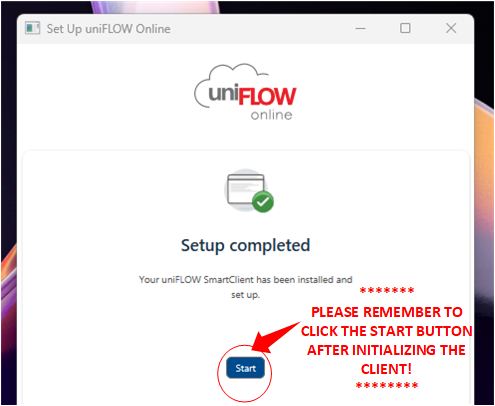](https://kb.gracechurches.org/uploads/images/gallery/2023-01/image-1675096747263.png)IMPORTANT: DON'T SKIP THIS STEP!!! Make sure to click on **"Start"** in the "Set Up uniFLOW Online window after the setup is complete! Otherwise, the SmartClient won't run in the background automatically, and you won't be able to send print jobs!
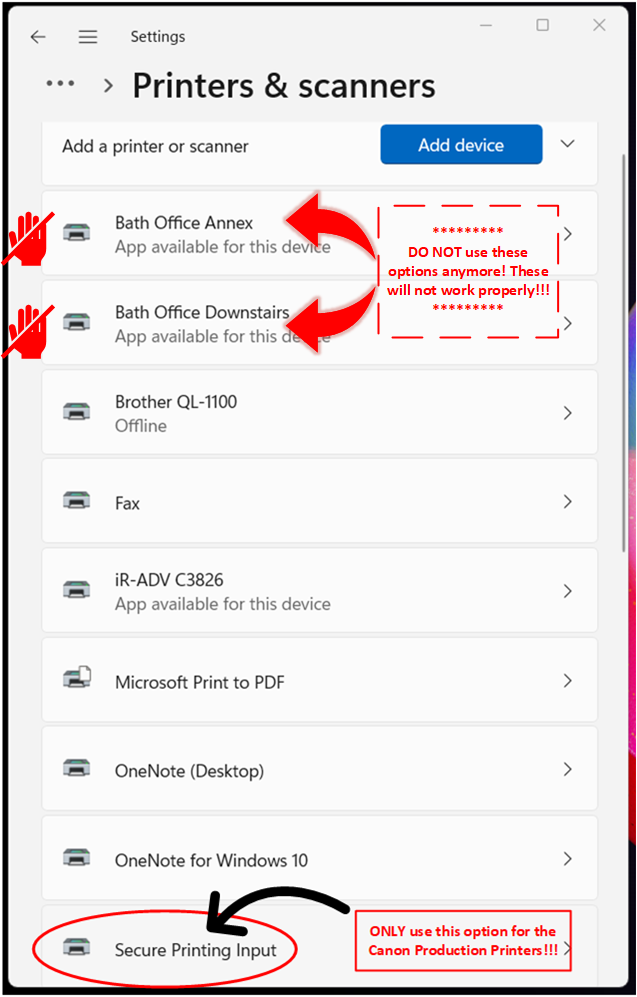
Once you click *Start* in the Uniflow window, the Client will automatically run in the background, and you will now be able to setup print jobs from your computer! #### **Two Printing Options** With the cloud printing capabilities we have now with the Canon printers, you can either print from your computer (using the Uniflow SmartClient software) or from the web (using the Uniflow Online Site). ##### **Uniflow SmartClient** You can print to the SmartClient from you word processing program of choice (Adobe, Excel, Word, PowerPoint, Chrome, etc). If you are going to be printing to a Canon Production Printer, use the Secure Printing Input option from the list of Printers. [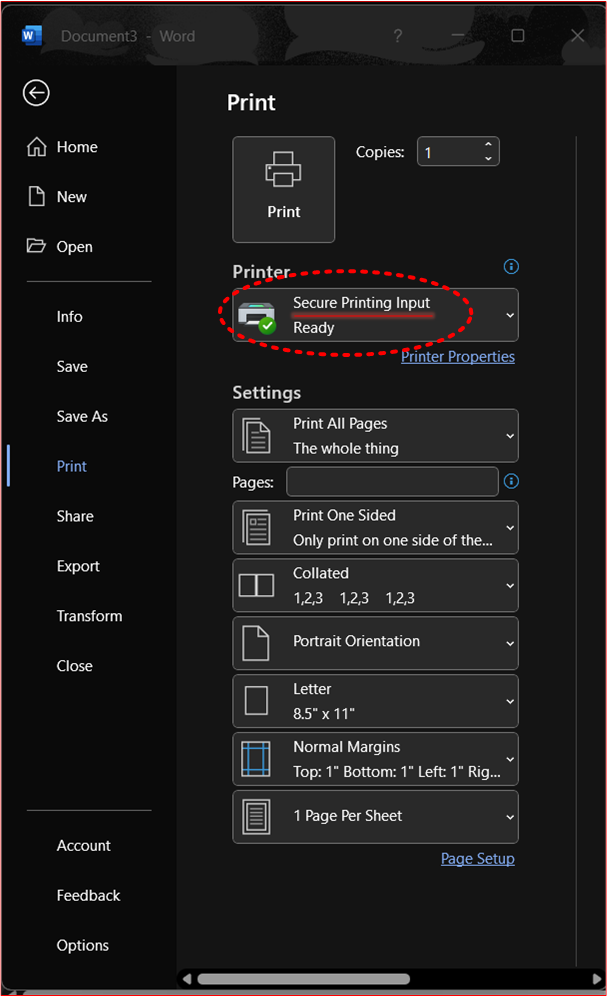](https://kb.gracechurches.org/uploads/images/gallery/2023-01/image-1675100579879.png)If you have been on staff when we still had the old Konica Minolta printers, we removed the local print drivers for the old printers through group policy. If for some reason you still have these in your list of printers (like below), please do not use these printer options as they will not work properly and aren't recorded for print auditing purposes. The Secure Printing Input printer option shown below is the only one that will let you print to any Grace Church Canon production printer.
[](https://kb.gracechurches.org/uploads/images/gallery/2023-01/image-1675101995614.png) After clicking *Print* from your Word Processing Application, a Uniflow Window will momentarily pop up to give you a few options. You can either select the Secure Print option, which lets you send your print job to the Uniflow Cloud Queue. Using this option, to receive your print you can walk up to *any* Canon printer and sign in using your associated Uniflow PIN code and test your print jobs and make any necessary adjustments from there. This is the recommended option if you need to print discretely or print any sensitive documents, or if you need to print at a campus that you aren't assigned to. Or, you can select any of the direct print options for the printers available for your campus. This will send the print job directly to the printer you choose and the selected printer will execute the job immediately. (See the below picture to see what the Uniflow Window will look like. It also shows the Direct Print options available to the Bath Campus) [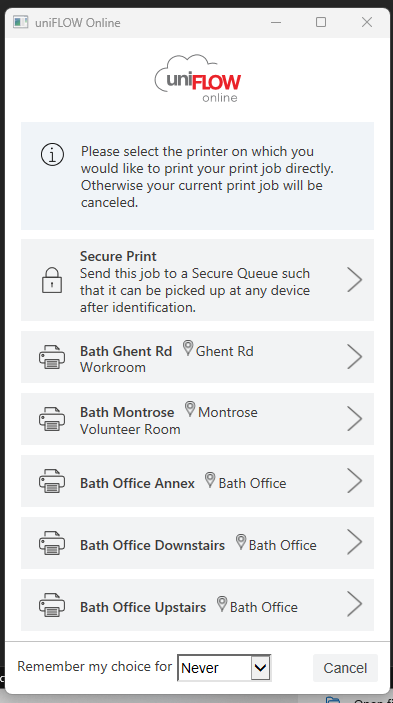](https://kb.gracechurches.org/uploads/images/gallery/2023-01/image-1675102415666.png)Make sure that you are on the Grace Staff network when doing Direct Print options. Otherwise, the SmartClient will be unable to communicate with the printers.
##### **Printer Settings** [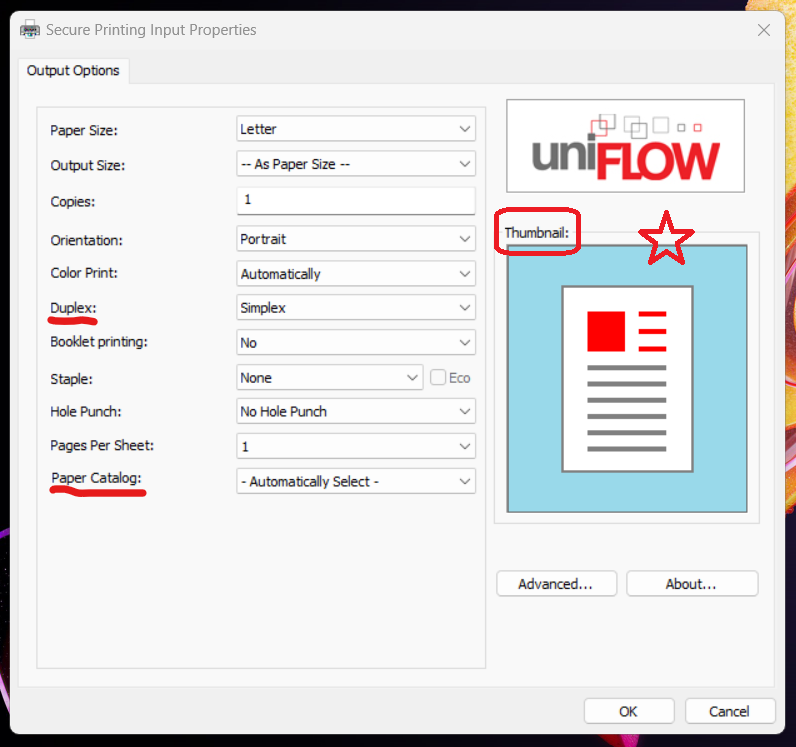](https://kb.gracechurches.org/uploads/images/gallery/2023-01/image-1675195283233.png) The Secure Printing Input driver printer properties/settings window comes as a simple interface with all the features that you can use with nearly all the printers. Most of these settings are self-explanatory, but it will help to point out a couple of settings that are not. - **Duplex:** This controls the 1-sided / 2-sided settings for your print job. There are 3 choices to choose from the Duplex Setting: - Simplex: This only prints one-sided paper. Only the front of the page is printed. When more than one page needs to be printed in a job, the printer will print on the next piece of paper. - Short Edge: This will print two-sided paper. **The pages are flipped or bound along the short edge of the page.** - Long Edge: This will print two-sided paper. **The pages are flipped or bound along the long edge of the page.** - **Note:** The Edges changes place depending on which orientation you choose. You can see an illustration of where the long or short edge is by referring to the thumbnail image as you are adjusting your settings. - **Paper Catalog:** - This setting will let you choose which tray to print to, including the normal and bypass trays. ##### **Reopen / Update the Client** Sometimes the client may fail to load. IF the client isn't running in the background, you will notice you won't be able to choose a direct print option nor the Secure Print option from the Smart Client. Usually, a quick fix can be done by searching and launching the application from Windows Search or macOS Launchpad. [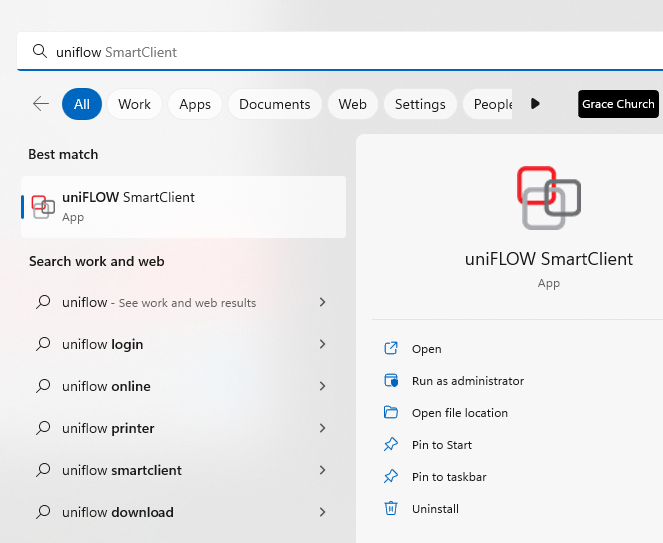](https://kb.gracechurches.org/uploads/images/gallery/2023-01/image-1675097315078.png) Another troubleshooting step you can take if you are still having printing issues even though the SmartClient is running is to update or reauthenticate your SmartClient. In the system tray or on the task bar right click the Uniflow SmartClient. In the submenu that appears, click on *About*. [](https://kb.gracechurches.org/uploads/images/gallery/2023-01/image-1675090093623.png) **(Make sure this application icon shows up, it lets you know the smartclient is running and is ready to process your print jobs for you).** In the window that appears, if there is an option to update, click the update button. You can also click on *Re-register* to further diagnose. Then click OK. [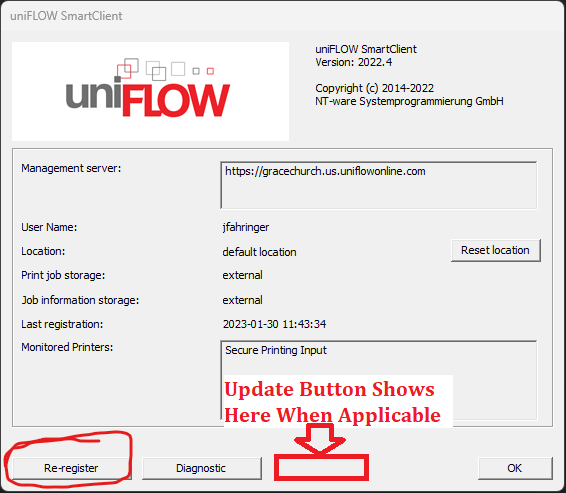](https://kb.gracechurches.org/uploads/images/gallery/2023-01/image-1675190541559.png) If you are still having issues loading up the Secure Print prompt, you can try to uninstall and reinstall the program using the SmartClient driver available for download from the Uniflow Dashboard mentioned earlier. You can also reach out to the IT Helpdesk: [Requesting IT Help Gra... | Grace Church KB (gracechurches.org)](https://kb.gracechurches.org/books/it-helpdesk/page/requesting-it-help-grace-church-and-momentum-ministry-partners)Note: Currently, the macOS Smartclient does require a more High level uninstallation method. If you need to reinstall the client on a Mac, please reach out to Grace IT to help you with this. This isn't an issue with Windows PC's.
--- ##### **Uniflow Online - Web Browser** This online dashboard will let you find and access anything printing or scanning. You can access it at [https://gracechurch.us.uniflowonline.com/](https://nam10.safelinks.protection.outlook.com/?url=https%3A%2F%2Fgracechurch.us.uniflowonline.com%2F&data=05%7C01%7Cjfahringer%40graceohio.org%7C8425928262d949bd1b0308dad474e375%7Cf80469b65a81464fa6f14ad8e4ac448a%7C0%7C0%7C638055895772201929%7CUnknown%7CTWFpbGZsb3d8eyJWIjoiMC4wLjAwMDAiLCJQIjoiV2luMzIiLCJBTiI6Ik1haWwiLCJXVCI6Mn0%3D%7C3000%7C%7C%7C&sdata=tj69sbpaT6hPQBDEeeQQyfYLDqj9dzRDh2mqgu%2BPSxY%3D&reserved=0), and the signin will be your GraceOhio.org credentials (or buildmomentum.org if you are MMP). The Dashboard view by default gives you a few widgets related to your account. There are additional widgets to choose from if you want to add them to your dashboard. Click the toggle box below to see what these widgets are.The parameter Support non-PDF file formats under [Print/Scan > Email print](https://gracechurch.us.uniflowonline.com/#Devices/MobilePrint) needs to be enabled to support file types other than PDF.
Email print jobs with unsupported file types are deleted. Therefore, they do not appear in the print job list.
### **Scanning** There are a few options you can choose from the printer directly when it comes to scanning. When you login to the printer with your Uniflow PIN, you see options to (please pay attention to the notes for the Scan to Exchange Online, Background Checks, Incident Report options): - ##### **Scan to Myself** [](https://kb.gracechurches.org/uploads/images/gallery/2023-01/image-1675106353143.png) - This first option just sends the scan to your graceohio.org email address. - You can rename the document before sending if you need to. - ##### **Scan to OneDrive** ##### [](https://kb.gracechurches.org/uploads/images/gallery/2023-02/image-1675781284041.png) - This option will save the scan to your laptop through OneDrive. - Use this if you are scanning a large job that would be too big to be an email attachment. - **NOTE: You will need to authorize Uniflow to use this function ** - Log in to Uniflow here: [https://gracechurch.us.uniflowonline.com/](https://gracechurch.us.uniflowonline.com/) - There will be a link under Dashboard > Notifications > Connect with OneDrive for Business (will be in a banner like this:) [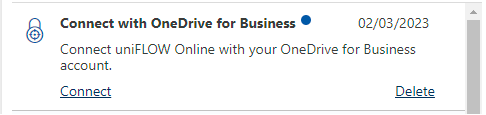](https://kb.gracechurches.org/uploads/images/gallery/2023-02/image-1675781501088.png) - Sign in with your Office 365 credentials - ##### **Scan to Exchange Online** [](https://kb.gracechurches.org/uploads/images/gallery/2023-01/image-1675106260111.png) - This option will let you send the scan as an email to anyone in the Grace Global Outlook Address Book, either directly or carbon copied. - **NOTE: You will need to authorize Uniflow to use this function ** - Log in to Uniflow here: [https://gracechurch.us.uniflowonline.com/](https://gracechurch.us.uniflowonline.com/) - There will be a link under Dashboard > Notifications > Connect with Exchange Online - Sign in with your Office 365 credentials - ##### **Scan to Background Checks** [](https://kb.gracechurches.org/uploads/images/gallery/2023-01/image-1675106322464.png) - This option will let you send your scan to the Background Checks SharePoint site. - **NOTE: Will also need authorized for you to scan to them** - Log in to Uniflow here: [https://gracechurch.us.uniflowonline.com/](https://gracechurch.us.uniflowonline.com/) - There will be a link under Dashboard > Notifications > Connect with SharePoint Online - Sign in with your Office 365 credentials - ##### **Scan to Incident Reports** [](https://kb.gracechurches.org/uploads/images/gallery/2023-01/image-1675106340203.png) - This option will let you send your scan to the Incident Reports SharePoint site location. - **NOTE: Will also need authorized for you to scan to them** - Log in to Uniflow here: [https://gracechurch.us.uniflowonline.com/](https://gracechurch.us.uniflowonline.com/) - There will be a link under Dashboard > Notifications > Connect with SharePoint Online - Sign in with your Office 365 credentialsIf you don't sign into uniFLOW and authorize Exchange & SharePoint the first time you go to use them, you will get an email with a link in it to authorize these connections, like the one below:
[](https://kb.gracechurches.org/uploads/images/gallery/2024-11/uniflow-onedrive-for-business-authorization-email.png)If you click on the link you will be able to click on "Authorize" in the Uniflow Dashboard to get started. Use your graceohio.org Office365 account to authorize Uniflow when you do this:
[](https://kb.gracechurches.org/uploads/images/gallery/2024-11/unilow-onedrive-for-business-authorization.png) [](https://kb.gracechurches.org/uploads/images/gallery/2024-11/mm3image.png) # Set uniFLOW Printer Device Settings #### Set Secure Printing Input Driver In order to use advanced printing options with the uniFLOW SmartClient/Secure Printing Input printer we need to change the printer driver and configure it to use all the options on our printers. To change the Print Driver either contact IT to be added to the Print Driver Deployment group or download and run the following script. You may need to Right-click the link and choose "Save Link As". [uniFLOW\_Cannon\_Driver](https://gracewebv3storage.blob.core.windows.net/drivers/uniFLOW_Cannon_Driver.ps1) #### Set the Finishing Options on the Canon driver After changing to the new Print Driver you'll need to import the correct print settings in order to have options for hole punch, stapling, folding, and more. To set the Finishing Settings; Open your Settings menu and select **Bluetooth & devices** > **Printers & scanners** then: 1\. Choose **Secure Printing Input** [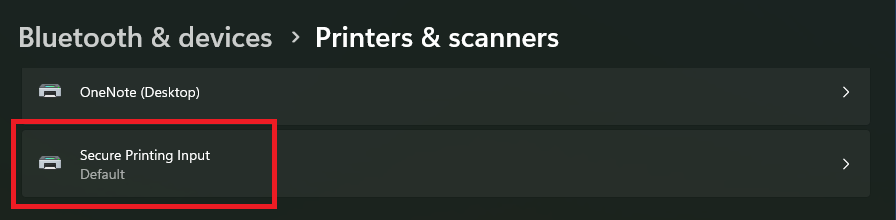](https://kb.gracechurches.org/uploads/images/gallery/2023-10/oikimage.png) 2\. Select **Printer properties** [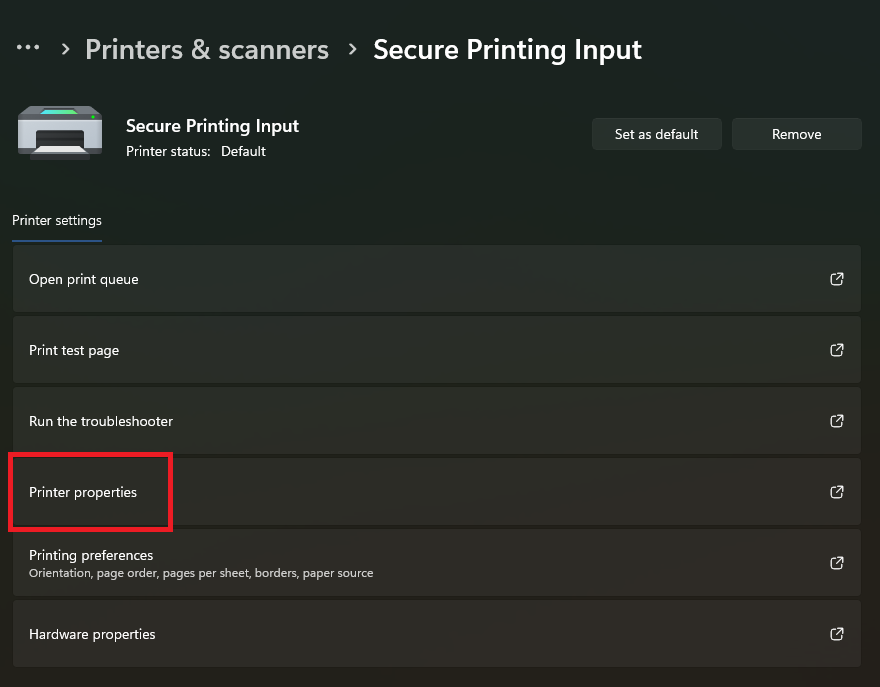](https://kb.gracechurches.org/uploads/images/gallery/2023-10/g6Limage.png) 3\. Go to the **Device Settings** tab and click the **Change...** button [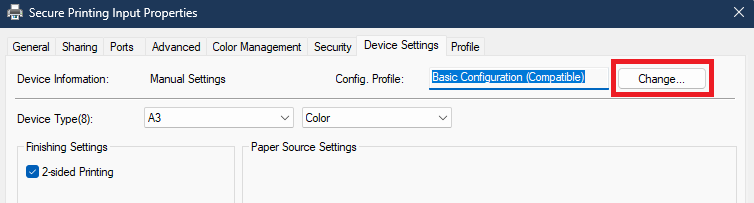](https://kb.gracechurches.org/uploads/images/gallery/2023-10/yEIimage.png) 4\. On the **Change Configuration Profile** window: 1. Choose **Select Manually** 2. Click the **Import Configuration Profile** button - Look for the file named: **Grace\_Church\_Printers.typ** - The file should be located in either you Documents folder or in C:\\temp 3. Clear the box next to **Retrieve Device Information** 4. Click **OK** [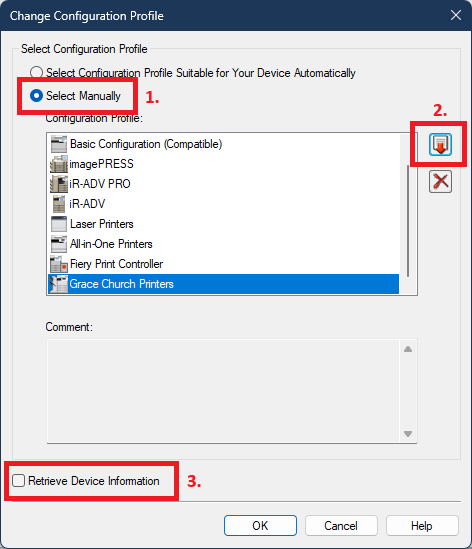](https://kb.gracechurches.org/uploads/images/gallery/2023-10/dgzimage.png) 5\. Click **Apply** to apply the profile [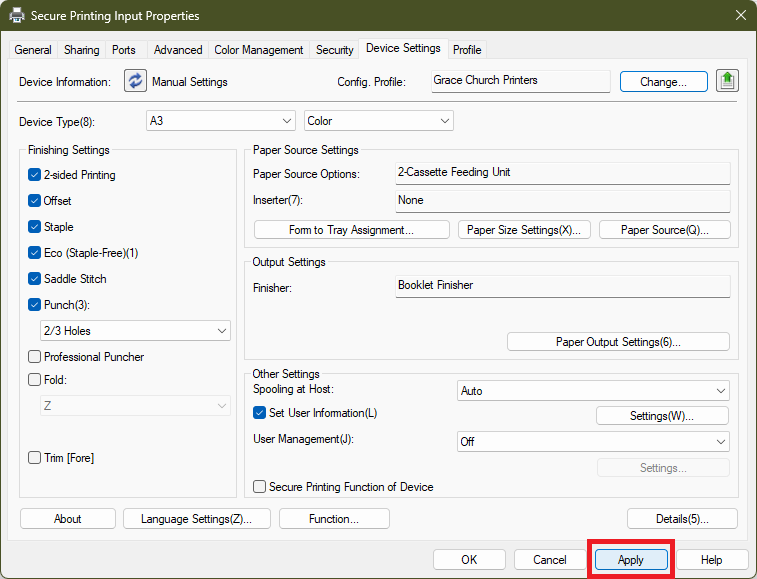](https://kb.gracechurches.org/uploads/images/gallery/2023-10/Pxzimage.png) # How to Update Uniflow Smart Client ##### **How to update Uniflow SmartClient on Windows and MacOS** We don't have the ability to automate updates to the SmartClient for you. These updates are necessary to let you continue sending print jobs to our Canon Production Printers, and to pull down printing privileges that may have updated. Thankfully, it is easy to accomplish. - Find the Uniflow SmartClient from the Taskbar / Menu Bar (bottom bar on Windows 11 or in the System Tray, top bar on macOS) [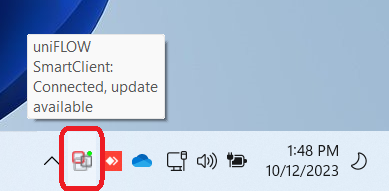](https://kb.gracechurches.org/uploads/images/gallery/2023-10/cAoimage.png) - If you can't locate the Client Icon on the Taskbar or running in the System Tray, try searching and run the Uniflow SmartClient App from Windows search or macOS Launchpad. - If after trying this you see a Status Window pop up like this: [](https://kb.gracechurches.org/uploads/images/gallery/2023-10/8Coimage.png) You can try quickly restart your computer and log back into your Desktop, and see if the SmartClient opens back up then. If not, reach out to Grace IT - Right click on the SmartClient System Icon in the Taskbar / Menu Bar. If there is an applicable update, you might see the option and simply select ***Update***. [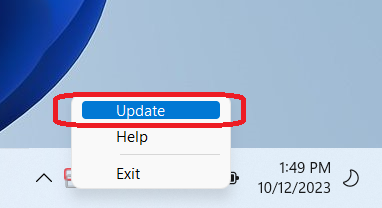](https://kb.gracechurches.org/uploads/images/gallery/2023-10/WYyimage.png) If you don't see that option, ***About*** will show instead. Click on ***About*** instead. If there is an applicable update, you can click the ***Update*** button that shows up: [](https://kb.gracechurches.org/uploads/images/gallery/2023-10/PItimage.png) - You will be brought up a prompt to provide administrative privileges to execute the update. [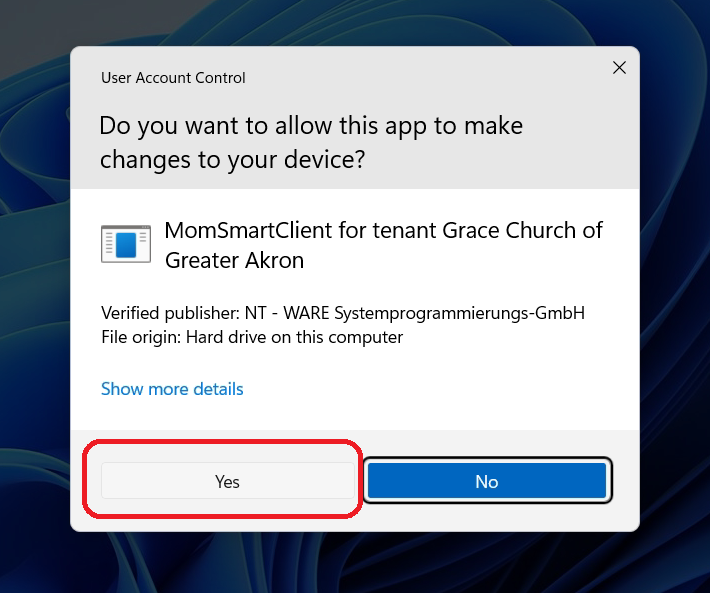](https://kb.gracechurches.org/uploads/images/gallery/2023-10/O8Limage.png) [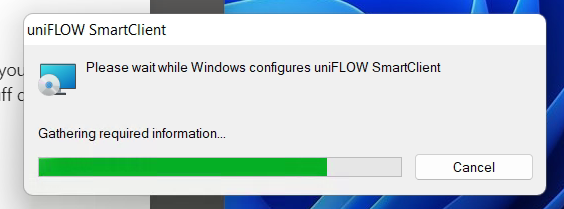](https://kb.gracechurches.org/uploads/images/gallery/2023-10/ylFimage.png) #### Re-Register the Application You can tell Uniflow to pull down any configuration changes that IT may have pushed out. Right click on the System Tray or Menu Bar icon for the SmartClient like we did earlier, select ***About***, and then click on Re-register. [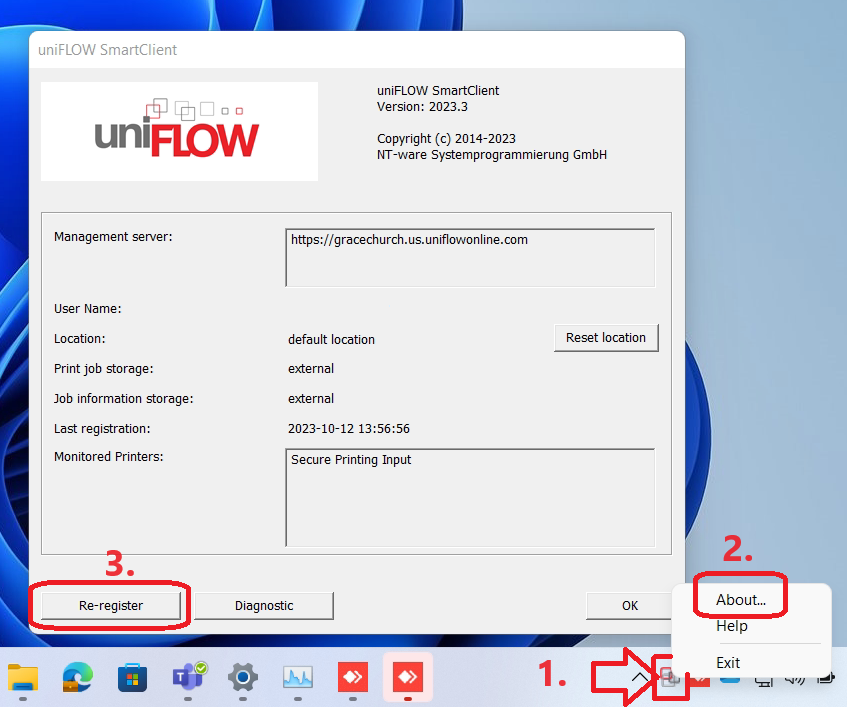](https://kb.gracechurches.org/uploads/images/gallery/2023-10/NYximage.png) # Printing Cardstock Paper and Finishing (Booklets) #### **Pre-Reqs**You need this prompt to show up in order to tell the copier to change the paper type to print on using bypass. If this prompt doesn't show up for you, make sure that the paper is loaded into the bypass tray correctly and that the sensor is able to detect that the paper is there. It is not required to be logged into the printer to be able to bring up the prompt.
##### Bath Campus Copiers - Bypass Tray At the Bath Campus, our Copiers are set to anticipate that you print Cardstock ON THE BYPASS TRAY. As long as you use the Bypass for this, you don't have to worry about changing the paper type on the Copier touchscreen. ### **Select Paper Type on Bypass Tray - Step By Step** 1. Load in the cardstock into the Bypass Tray. 2. A prompt should show up on the Copier TouchScreen. Hit "Change" next to Paper Type. [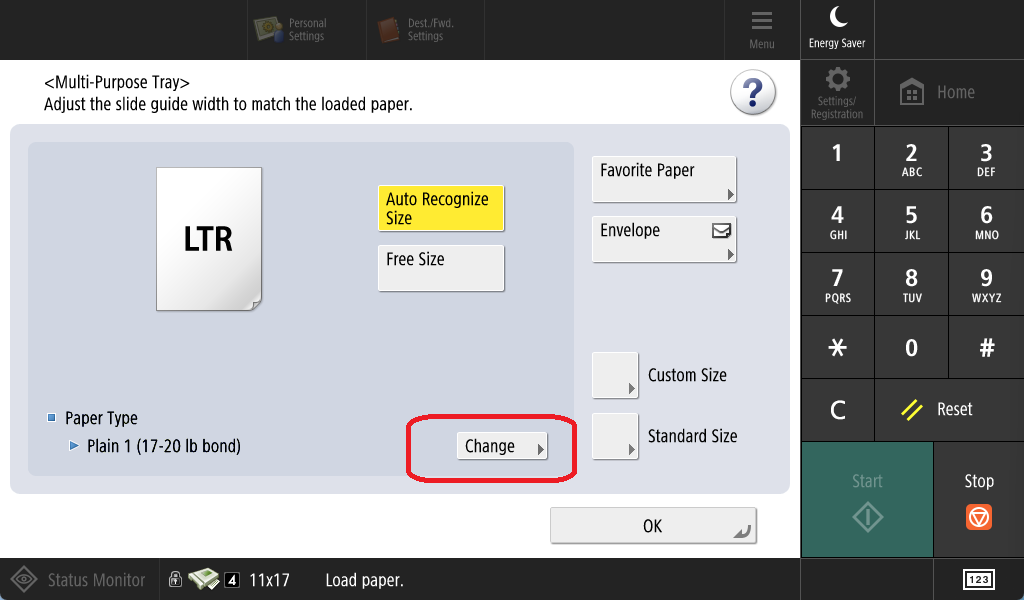](https://kb.gracechurches.org/uploads/images/gallery/2023-06/image.png) 3. Choose one of the heavy paper options in the next screen. Here I tap Heavy 7, which is the heaviest paper available, but your campus might use a different cardstock (i.e., Bath SHOULD be using Heavy 7 paper). Tap Okay to Confirm. [](https://kb.gracechurches.org/uploads/images/gallery/2023-06/1-heavy.png) 4. Then tap Okay again, verifying that Heavy is loaded in as the paper type. You have now told the printer that the Bypass Tray is loaded with Cardstock paper (or Heavy). [](https://kb.gracechurches.org/uploads/images/gallery/2023-06/H2P2-confirm-heavy-type.png) **Below are some animations of examples of how you may be printing Cardstock:** ### **Making Cardstock Copies using Bypass Tray** [](https://kb.gracechurches.org/uploads/images/gallery/2023-06/viewer-ztmz5fw3gj.gif) ### **Cardstock Print to Secure Print using Bypass Tray** [](https://kb.gracechurches.org/uploads/images/gallery/2023-06/viewer-6wjs3vch92.gif) ### **Direct Print (On Windows)**Remember: You need to add the Print Profile to the Secure Print Driver in order to change paper type on the Windows driver!!!! OTHERWISE YOU WON'T BE PRINTING CARDSTOCK PROPERLY
Note: Currently as of April 2024, while they do have most of the finishing options the macOS Uniflow Print drivers do not support selecting Cardstock as your paper type. If printing from a mac, please use the Secure Print Queue method to do cardstock printing.
To Direct Print Cardstock instead of doing it all in Secure Print, prepare the printer bypass tray with cardstock, and then you just need to change the following print settings under the Paper Source Tab in the Print Driver window: - Paper Source: Multipurpose Tray (the bypass) - Paper Type: Heavy Setting (select Heavy corresponding to the cardstock density your campus uses) - Use one of the Printer Options, Secure Print or Direct Print. [](https://kb.gracechurches.org/uploads/images/gallery/2024-04/nvidia-share-xataheglz0.gif) ## **Tutorials** ### **Printing (Cardstock) Booklets** In addition to cardstock, some of our Production printers have finishing abilities like staple, holepunch, folding, saddle stich printing, etc. The most recent version of our Uniflow Secure Print Driver allows you to use most of these finishing options; however, the driver assumes that you will be printing on a printer that supports those finishing options that you select. Not all of our printers have all the finishing options, so the best way to set your options is to - From your computer, submit your print job to the Secure Print Queue printer instead of Direct Print - Load up the appropriate tray for the paper you will be using - I still recommend using the Bypass tray for Cardstock paper, and using the above instructions for changing paper type on the bypass tray. - Login and open the Secure Print app on the Copier. Find your print job you uploaded. - Finalize your print settings and finishing options on the Copier Touchscreen interface. - The Copier screen will confirm which finishing options it supports by displaying the options. - Do a Test print to make sure that the copier will print what you expect it to. - Make any necessary adjustments and then execute your entire print job. This tutorial we will use the Copier to set the settings our print job for a 3 page double-sided booklet. It is a journaling pamphlet PDF that the Collective Young Adult ministry printed for their spring retreat which you can download from here and take a look at: [Collective 2024 Spring Retreat.pdf](https://kb.gracechurches.org/attachments/23) #### **Pre-Req** - Please make sure you checked the above Pre-Req's. #### **Secure Print Queue Method:** This is what we recommend everyone to use. This method applies to both Windows and Mac's. Open your favorite PDF viewing tool (Adobe Acrobat \[without McAfee Security\], Microsoft Edge, or Google Chrome should work) and load the PDF on it. Hit the option to Print or hit the Ctrl+P hotkey. Then, select the Secure Printing Input Printer and hit Print:| [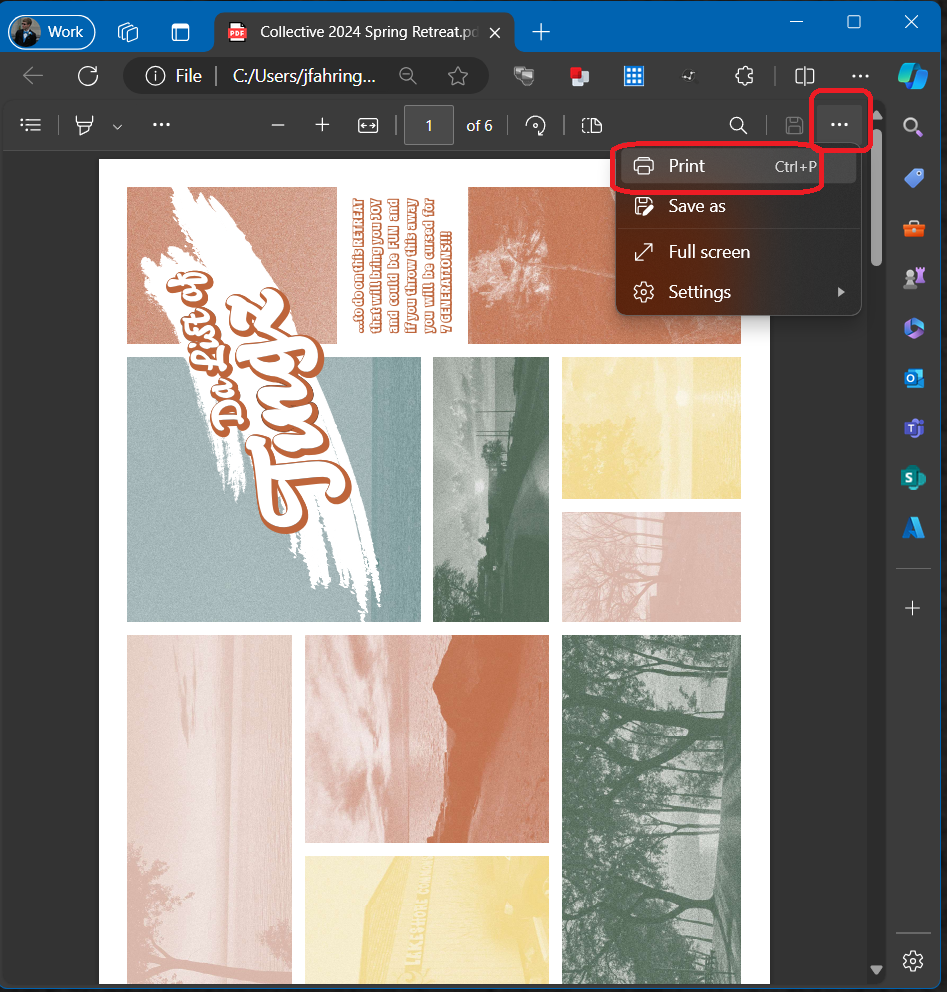](https://kb.gracechurches.org/uploads/images/gallery/2024-04/aNkimage.png) | [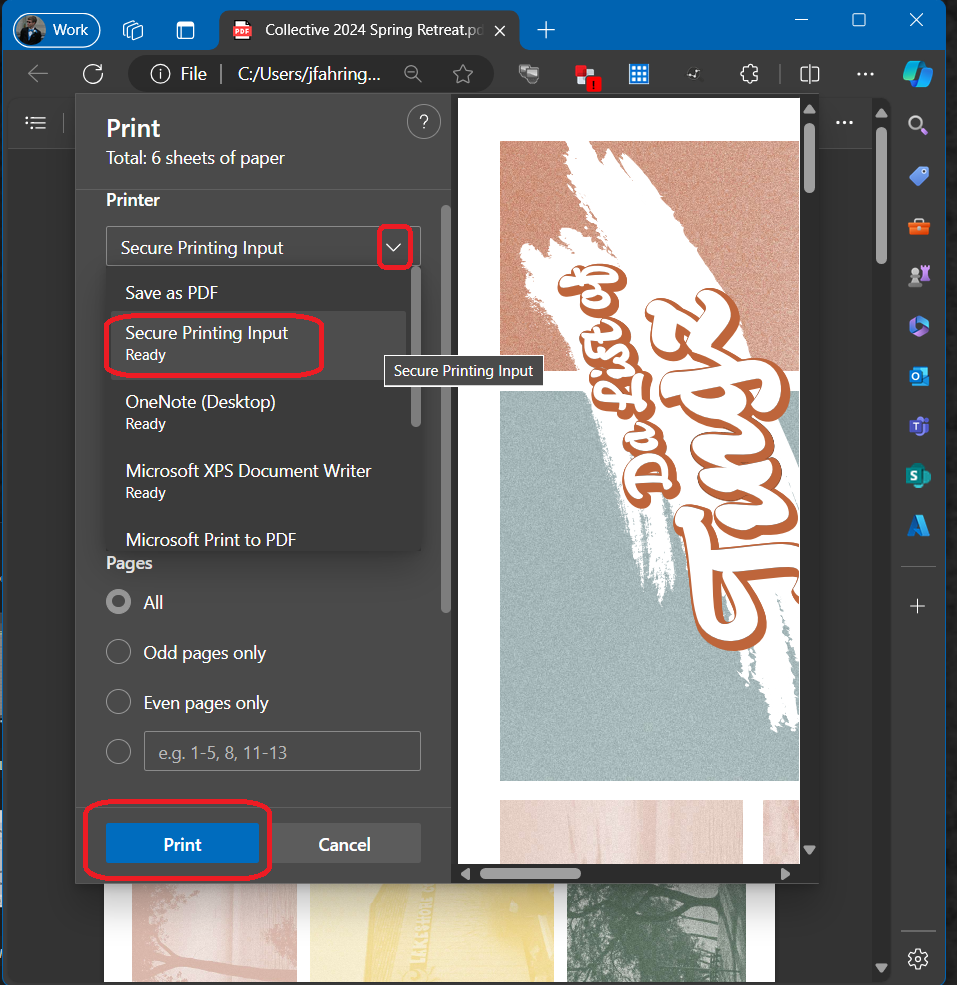](https://kb.gracechurches.org/uploads/images/gallery/2024-04/GLTimage.png) |